
My Colorful Life: Episode 06
Every year it blindsides me out of nowhere... my girls are growing up! This year was no exception, with the craziness of our lives this past year it’s like I haven’t had a moment to stop and reflect on the fact that they are growing and changing so much right now. It seems like almost yesterday they were teeny tiny babies (although those years were quite the blur themselves) and now they are riding bikes and practicing writing words! I never want to wish them to stop growing but at the same time these years are just flying by too quickly!!
So that little recap brings us to 5!!!!! My two little five year olds chose to have a princess party which is totally fitting seeing as how we frequent Disneyland and they have taken such fascination and affection to all of the princesses there! Now, I am known to overdo it a bit on my parties, and in knowing such I scaled it back (or tried to anyways) a bit this year. We rented out a park shelter, and other than purchasing items, I was left with little to do other than a few simple tasks and setting it all up the day of! It was really lovely!! So if you are in the market for some princess party ideas, or if you are just intrigued as to what exactly went into this party, let me give you all the details here! Enjoy!!
Some links in this post are affiliate links which means I will receive a small commission if you purchase through the link provided. It is not necessary to shop through my links but if you do THANK YOU for your support of me and my blog! See Disclosure For More Details
Backdrop:
I always focus my parties around a backdrop because I feel it helps set the tone and theme of a party and allows for great photos. Seriously, you could have your party in a parking lot and, with a good backdrop, make it into a luxurious setting!
Well, this time around I knew I wanted something with color and also something that had a softer feel to it and didn’t scream “PRINCESS”… something a little more subdued if you will. I didn’t really know what this would entail until I came across these gorgeous paper flowers form Forever Flowers by MK on Etsy. They were just so stunning and a showstopper in their own right that I knew I could make these the focus of the backdrop and not have to do too much more! A few weeks after ordering with Melissa I stumbled across this gorgeous hot pink pintucked fabric at Hobby Lobby and it was on CLEARANCE!!! Only $2.00 a yard and I just knew the princess party gods were smiling down on me 😉! I added one last piece to the puzzle in buying some greenery branches to make into a garland to both add some greenery and also enhance the beauty of the flowers.
All in all, this backdrop came together very easily, with little time spent on the project thanks to the ready made flowers and the wonder of Heat N Bond Tape (A no sew- heat activated tape)! You can check out this mashup of my DIY videos stories that I had posted to Instagram along the way to get a little bit of an idea of how easy this was to put together. After completing the backdrop I simply poked a hole on each corner and one right in the center to which I threaded some pink ribbon through and tied into a loop for hanging. Once hung the greenery garland was hung and the paper flowers were adhered simply with double sided tape… took all of about five minutes to put up on the morning of the party and lasted all day, including moving it to a separate location!

Paper Flowers: Forever Flowers by MK (she is so talented and sells out so order ahead of time!)
Pintucked Fabric: Hobby Lobby
Vine Branches:Hobby Lobby
Heat N Bond Ultra Hold Tape: Hobby Lobby (also from Amazon)
Twine & Ribbon For Hanging + Double Sided Tape: Michaels
Entertainment:
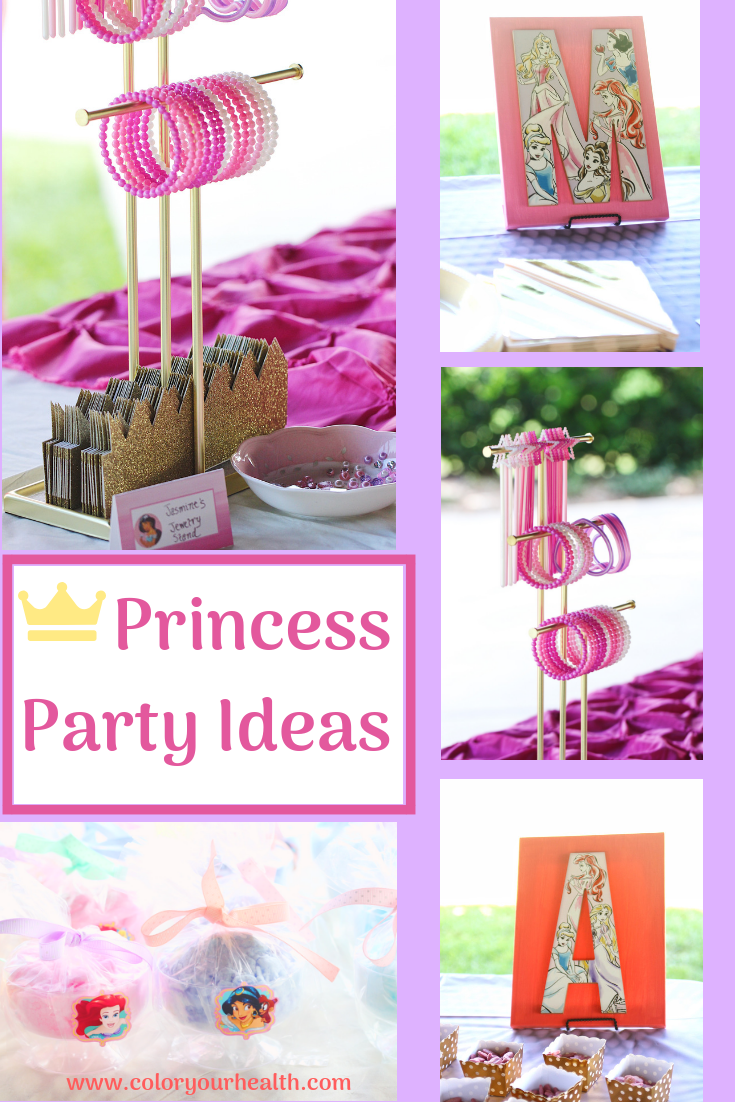
I have learned along the way that no matter how awesome the party decor is, a children’s party is not fun without some awesome entertainment! We had Rapunzel from Party Karacters come to the party for one hour where she made flower balloons for the children, placed glitter tattoos, and lead them in singing and dancing to songs from Tangled. While there was a line for the balloon making the children were able to play at the park that was just steps away from the shelter that we were holding the party in, so that worked out very well. In the future for entertainment characters like this I would probably choose something that was more interactive throughout the whole time as opposed to activities where the children have to form a line (although balloon making was the one request from the girls so it was a must and they loved it!!)! Prior to the princess arriving the children selected jewelry to dress up with from “Jasmine’s Jewelry Bar” - wands, bracelets, and glitter paper crowns were displayed on a jewelry stand while a bowl of sticker earrings sat nearby.
Princess Rapunzel: Party Karacters
Wands: Party City (also on Amazon)
Bracelets: Party City (also on Amazon)
Paper Crowns: Target
Sticker Earrings: Claires (also on Amazon)
Jewelry Stand: Amazon (this was one I already own for my own jewelry)
Food:
I tried to keep it relatively simple with the food and after Pinterest gave me a couple of fun wording ideas I managed to jazz up some basic foods and snacks and make them fit into the princess theme! The girls only food request was pizza and I was more than happy to oblige in this easy request. Each food item had a place card in front of it to carry on the princess theme and I used a combination of disposable treat cups/containers as well as a few platters to display the food. Here is a list of the food items we had:

Aeriel’s Fish Friends (Goldfish in treat cups * I used the princess goldfish for this so they were purple colored)
Rapunzel’s Royal Pizza
Cinderella’s Pumpkins (Small Clementines/Tangerines)
Tiana’s Tasty Carrots (Baby Carrots in treat cups)
Belle’s Beautiful Wands (Grape and Watermelon Fruit Kabobs With The Watermelon Cut Into Stars using a star cookie cutter and kabob skewers/treat sticks)
Dessert:
I also tried to keep it simple yet fun with the treats and desserts. I have never been one to spend lots of money on fancy cakes because I would personally rather spend the money on other party decor. This year the girls asked for cotton candy for their dessert yet I knew that this wouldn’t be something everyone would want so we had cotton candy to take home for all of the children but for “cake time” I made and frosted cupcakes (from the box not from scratch because I’m keeping things easy, remember!!??) and allowed the children to decorate their own cupcakes for a dessert/activity combination. For decorating the cupcakes I placed the frosted cupcakes with a princess crown cupcake pick in the center of a plastic paint palette. The paint palettes were then placed on pink disposable charger plates and each of the wells in the paint palettes were filled with a tiny amount of sprinkles which allowed the children to decorate their own cupcakes. This was such a hit, and if I’m being honest was probably my favorite part of the party just because it was so cute!!
For the cotton candy, I simply bought bulk tubs from Homegoods (great price, $4 for a tub), and portioned it out by color into disposable dessert goblets. Note: I did this the night before the party so it wouldn’t dry out. After placing it in the goblets I put the goblets in a clear treat sack and secured it tightly with ribbon. I then placed a princess sticker on the front to keep up with the theme. At the party I displayed them by color because I am OCD like that LOL!

Cupcake Sleeves: Michaels
Plastic Paint Palettes: Hobby Lobby (Pk of 10) (Also On Amazon)
Sprinkles: Michaels (small $1 packs)
Cotton Candy: Home Goods
Cotton Candy Plastic Goblets & Treat Bags: Hobby Lobby
Ribbon: Michaels
Stickers: Target
Disposable Charger Plates: Homegoods (Also On Amazon)
General Decor & Paper Products:
Outside of the backdrop I did not do a whole lot of other decorating. Simple place cards with princess character stickers were sprinkled throughout the tables to add to the fun theme and tie everything together, and paper tablecloths were draped over the tables (and adhered with double stick tape) to easily transform the park shelter into an elegant setting! I did pick up a few princess signs at Hobby Lobby as well that I added to the main table and otherwise let the foods and desserts + goody bags “dress up” the remainder of the tables.
The only other DIY I did was pretty simple canvas piece. I purchased the girls initials(letters) from Hobby Lobby that had princess painted on them. They were relatively inexpensive, I think maybe $5 each. I then purchased 8x10 canvases from Michaels and painted them in two different colors (a light pink and coral color). After the paint dried I simply glued the letters to the canvas and displayed those on the pizza table. I always try to to either buy decor that is reusable for another theme/party or that I can turn into permanent home decor. In the case of this party I have saved the vine/leaf garland and the fabrics to reuse for another party. I then hung the paper flowers and the canvas initials in the girls room and displayed the princess signs on their bookshelf!
Pro Tip: Begin planning several weeks ahead and make several trips to Michaels and Hobby Lobby so you can take advantage of their 40% off coupons (you can use one per visit), and keep your eye on the sales at Hobby Lobby because you can usually time it such that you can go when fabric, faux florals, decor. etc. is already on sale! Party City also usually has a coupon if you keep an eye out. I don’t think that I paid full price for any party related items except for those at Target or Homegoods!
Place Cards: Michaels
Princess Stickers: Target
Paper Tablecloths: Party City
Napkins: Homegoods
Disposable Plates: Party City
Goody Bags: Michaels
Ribbon: Hobby Lobby
Canvas: Michaels
Princess Letters & Signs: Hobby Lobby
Craft Paint: Michaels
And here is to 5, may it be an amazing year ahead for these two twincesses!